Hổ trợ trực tuyến
|
|

|
|
|

|
 0868317692 0868317692
|
|
 0902937088 0902937088
|
|
 Mr. Bỉ: nguyenbi@ansgroup.asia |
|
 Ms Liên: lien.ans@ansvietnam.com |
|
Menu sản phẩm
Ứng dụng
Hãng sản xuất
Lượt truy cập

|
Đang online | 74 |

|
Lượt truy cập | 9172264 |
Hans schmidt Vietnam - Motorized Torque Stand MTS

Loại sản phẩm: Torque Meter
Mã sản phẩm: Motorized Torque Stand MTS
Nhà cung cấp: Anh Nghi Sơn
Xuất Xứ: chính hãng
Hãng sản xuất: Hans schmidt
Giá : Vui lòng liên hệ
Measuring range 0 - 2.000 Nm, 5.000 Nm or 10.00 Nm
Resolution depending the range 0.001 Nm or 0.01 Nm
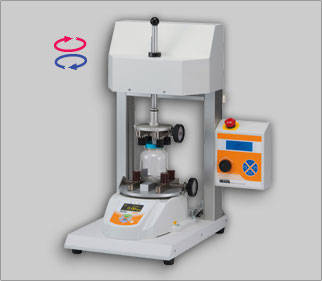
 Torque Stand MTS
Model Informations
 Print version
Special Features Torque Stand
- The motorized torque test stand can be configurated according the customers demand. The torque stand exists out of a test stand depending the sample height, a torque meter with different ranges and features as well as a upper chuck and lower table .
- The torque will be measured without influence by the operator. The results are more accurate and significante as measured with a manual device.
- 3 operation modes:
Normal: Revolution occurs in the selected direction, until the stop-switch will be pressed
+NG Stop: Revolution occurs in one direction, until the adjusted value is reached
Endurance Test: Repeats the operation in two directions (open - close), within the adjusted limits (MTS series). The number of repeats are shown in the display. The opening and closing angel, as well as the number of repeats can be adjusted with MTS-RA series
 |
The following information are shown in the display
|
- Max. size of samples:
- upper clamping chuck Ø 20 - 90 mm or Ø 7 - 50 mm
- lower clamping table Ø 20 - 160 mm or Ø 7 - 50 mm
- Max. available sample height 140, 240 mm or 340 mm - The rotation speed can continuousely be adjusted 3 - 90 degree/sec. The value will be displayed.
Special Features torque meter
- 2 Display Modes:
Real Time - displays the actual torque
Peak Force - to measure and save the peak torque - Display the opening or closeing torque (clockwise and counter clockwise torque)
- 3 selectable units: Nm, kgfm, Lbf.in or Ncm, kgfcm, ozf.in
- Programmable high/low setpoints for go/no-go testing with color-coded indicators (orange, green, red) in the LED display

- Torque meter with high internal sampling rate of 2000 times/sec to capture peak values.
- Storage of 1000 values for recall:
- On the display
- For data transfer to a PC
- For printing with report - 4 output signals: USB, RS232, analog, and Mitutoyo Digimatic
- Display update time 10 times/sec
- Easy to read display (OLED) for Real Time or Peak value including units. Depending to the series additional information are displayed as e. g. memory, number of go testings, limits, 1st and 2nd peak values etc.

- Indication of 1st and 2nd peak value per measurement, e. g. closure with predetermined break point
- Readings can be transfered from the internal memory to an USB flash drive or directly saved on it (sampling rate 100 times/sec)
- 2 comperator values can be set; If the reading reaches one of the output values, data will be sent to external devices (e.g. PC, printer) for data recording
- Force-angle measurements are possible. The software "Force Recorder Professional" is additionaly required
Standard Features
- Torque measuring unit for fast, accurate measuring
- High repeatability
- Easy to use
- Inclusive 30 days trial version of Software »Force Recorder Professional«
- Manufacturer`s certificate with measured values is included
Required Moduls
 |
Torque Stand Available with standard features or with code RA (Necessary for force-angle measurements). Sample Height up to 340 mm |
 |
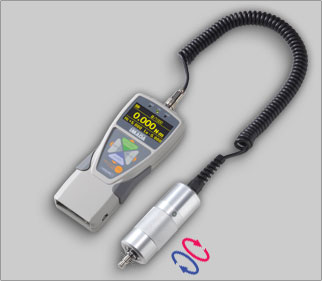
Torque Meter Available as standard model DTXS or DTXS-Z, as well as torque meter DTXA or DTXA-Z with additional funcitions (Necessary for force-angle measurements). The models DTXS and DTXA will be delivered with standard table, while type Z has no clamping device. |
 |
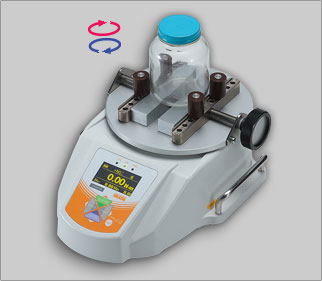
Lower Clamping Table The lower clamping device has to be mounted at the torque meter. It can be selected between a large or a small clamping table, as well as a torque pin chuck. The clamping tables are available with different table pins. |
 |
Upper Clamping Chuck The upper clamping device has to be mounted at the torque stand. It can be selected between a large or a small clamping chuck, as well as a torque pin chuck or an adapter with M10 male thread. The small clamping chuck is available with different table pins. |
 |
Software The software "Force Recorder" is required for data aquisition by USB output. 3 versions are available, in which "Force Recorder Professional" is necessary for force-angle measurements. |
Available Torque Stands
| Model | Max. Sample Height | Description |
| MTS-10N | 140 mm | |
| MTS-10N-L | 240 mm | |
| MTS-10N-2L | 340 mm | |
| MTS-10N-RA | 140 mm | with rotary encoder |
| MTS-10N-L-RA | 240 mm | with rotary encoder |
| MTS-10N-2L-RA | 340 mm | with rotary encoder |
Available Models - Standard Model*
| Model | Model | Measuring range | Resolution |
| DTXS-2N | DTXA-2N | 0 - 2.000 Nm (200 Ncm) | 0.001 Nm (0.1 Ncm) |
| DTXS-5N | DTXA-5N | 0 - 5.000 Nm (500 Ncm) | 0.001 Nm (0.1 Ncm) |
| DTXS-10N | DTXA-10N | 0 - 10.00 Nm (1000 Ncm) | 0.01 Nm (1 Ncm) |
Available Models - self configurated
| Model | Model | Description |
| DTXS-2N-Z | DTXA-2N-Z | without table |
| DTXS-5N-Z | DTXA-5N-Z | without table |
| DTXS-10N-Z | DTXA-10N-Z | without table |
Lower Clamping Table
 |
Table For samples with Ø from 20 up to 160 mm. Click picture for more information |
 |
Table For samples with Ø from 20 up to 160 mm. Click picture for more information |
 |
Table For samples with Ø from 20 up to 160 mm. Click picture for more information |
 |
Small Table For samples with Ø from 7 up to 50 mm (for max. 5 Nm nominal load). Click picture for more information |
 |
Small Table For samples with Ø from 7 up to 50 mm (for max. 5 Nm nominal load). Click picture for more information |
 |
Small Table For samples with Ø from 7 up to 50 mm. (for max. 5 Nm nominal load). Click picture for more information |
 |
Torque Pin Chuck Infinitely adjustable, 0.5 up to 6.5 mm Ø Click picture for more information |
 |
Torque Pin Chuck Infinitely adjustable, 0.5 up to 6.5 mm Ø, stainless steel (V2A) Click picture for more information |
 |
Torque Pin Chuck Infinitely adjustable, 0.5 up to 4 mm Ø (for torque meters with 2 or 5 Nm nominal load). Click picture for more information |
 |
Torque Pin Chuck Infinitely adjustable, 1.2 up to 12 mm Ø (for torque meters with 5 or 10 Nm nominal load). Click picture for more information |
Upper Clamping Chuck
 |
Clamping Chuck for samples with Ø from 20 up to 90 mm. Click picture for more information |
 |
Clamping Chuck for samples with Ø from 7 up to 50 mm (for max. 5 Nm nominal load) Click picture for more information |
 |
Clamping Chuck for samples with Ø from 20 up to 50 mm (for max. 5 Nm nominal load). Click picture for more information |
 |
Clamping Chuck for samples with Ø from 7 up to 50 mm (for max. 5 Nm nominal load) Click picture for more information |
 |
Torque Pin Chuck Infinitely adjustable, 0.5 up to 6.5 mm Ø Click picture for more information |
 |
Torque Pin Chuck infinitely adjustable, 0.5 up to 6.5 mm Ø, V2A Click picture for more information |
 |
Torque Pin Chuck infinitely adjustable, 0.5 up to 4 mm Ø Click picture for more information |
 |
Torque Pin Chuck infinitely adjustable, 1.2 up to 12 mm Ø Click picture for more information |
 |
Adapter With M10 male thread Click picture for more information |
Standard Accessories
 |
ZT Logger USB cable approx. 1.5 m long, CD-ROM with USB-driver and software "ZT-Logger" for data transfer |
 |
AC Adapter For 100 - 240 V AC Order number: ADW-6010 |
 |
Inspection Certificate Delivery includes a manufacturers inspection certificate free of charge Click picture for more information |
Accessories optional
 |
Force Recorder Light Software for data aquisition by USB output - Force-time graph - Force gauge function setting - Data storage as CSV file Order number: SW-21 |
 |
Force Recorder Standard Additional functions in comparision to Force Recorder Light: 5 graphs at maximum can be displayed in a table Order number: SW-22 |
 |
Force Recorder Professional Additional function in comparision to Force Recorder Light - 5 graphs at maximum can be displayed i a table - Force-angle graphing (possible only in combination with an angle meter) Order number: SW-23 |
 |
Printer To print stored values using Mitutoyo Digimatic output. Click picture for more information |
 |
Paper Roll For Printer DP-1 VR, 1 Set = 5 pieces Order number: DP-P |
 |
Table Pins 1 set (4 pieces), 25 mm long with urethane surface for the table. Click picture for more information |
 |
Table Pins 1 set (4 pieces), 26 mm long from stainless steel for the table. Click picture for more information |
 |
Table Pins 1 set (4 pieces), 70 mm long with urethane surface for the table. Click picture for more information |
 |
Table Pin 1 set (4 pieces), 10 mm long with urethane surface for the small table. Click picture for more information |
 |
Table Pins 1 set (4 pieces), 10 mm long from stainless steel for the small table. Click picture for more information |
 |
Table Pins 1 set (4 pieces), 30 mm long with urethane surface for the small table. Click picture for more information |
 |
Sample Stage To get a flat working face on the table, for placing the sample. Click picture for more information |
 |
Extension Shaft for lengthening the main shaft to clamp samples with lower height. Click picture for more information |
 |
Connecting Cable For analog output, for connection to a line recorder. Length approx. 3 m Order number: CB-108 |
 |
Connecting Cable For RS 232 output with sub D 9 female, for connection to PC. Length approx. 3 m Order number: CB-208 |
 |
Connecting Cable For Mitutoyo Digimatic output, for connection to Mitutoyo printer DP-1 VR. Length approx. 3 m Order number: CB-308 |
 |
Connecting Cable with open ends (37-pin) for all available output signals to connect an unique device. Order number: CB-908 |
 |
Connecting Cable for trigger input (input signal from an external device e. g. electronic switch to stop the measurement) Order number: CB-808 |
 |
Accumulator Nickel metal hydride accumulator, 2-pole connector Click picture for more information |
 |
Calibration Certificate Calibration certificate with calibration report is optional available. |
Delivery Includes
Specifications
| Torque Stand | |
| Sample Height: | max. 140, 240 or340 mm |
| Speed: | 3 - 90 °/s adjustable |
| Temperature range: | 0 - 40 °C |
| Air humidity: | 80 % RH, max. |
| Power supply: | 100 - 240 V AC, 50/60 Hz, max. 3 A |
| Housing dimensions: | See dimensions |
| Weight: | 14 kg net without accessories |
Torque Meter |
|
| Accuracy: | ±0.5 % full scale ±1 digit |
| Measuring frequency: | 2000 times/s |
| Selectable units: | Nm, kgfm, Lb.in oder Ncm, kgfcm, Lb.in |
| Display: | OLED, 4 digit, 14 mm high |
| Overload protection: | Approx. 200 % full scale flashing display beyond 110 % full scale |
| Display update: | 10 times/s |
| Memory: | Internal memory for max. 1000 values, (clockwise or counter clockwise and peak values) |
| Setpoints: | Min (-NG), Max (+NG) adjustable with output signal |
| Output signal: | USB RS 232 C (8, 1, N, 19200) analog ±2 V DC Mitutoyo Digimatic Open collector 4x (+NG, Ok, -NG, OVL), max. 30 V DC, 10 mA overload signal |
| Temperature range: | 0 - 40 °C |
| Air humidity: | 80 % RH max. |
| Power supply: | Rechargeable NiMH battery pack (approx. 8 hours continous use) and/or AC adapter 100 - 240 V AC with two adapters (EU/USA) |
| Housing dimensions: | 305 x 233 x 127 mm (LxWxH) |
| Weight, net (gross): | Approx. 4900 g (Approx. 5900 g) |
additional functions model DTXA in comparision to model DTXS |
|
| Memory: | Readings can be transfered from the internal memory to an USB flash drive or direcly saved on it (sampling rate100 times/s) |
| High low output: | 2 high/low output values can be set. If the reading reaches one of the output values, data will be sent to external devices (e. g. PC, printer) for data recording |
| Extended peak mode: | Indication of two peak values per measurement |
additional functions model MTS-RA in combination with DTXA |
|
| Force displacement measurement: | The Software Force Recorder Professional is required |


 top
top


